Uncategorized
How to skin parts with carbon fibre
When you can’t afford to go through the process of making moulds of an existing part, wrapping or skinning the part in carbon fibre is always an option. Especially on interior parts.
Thoughts before you start
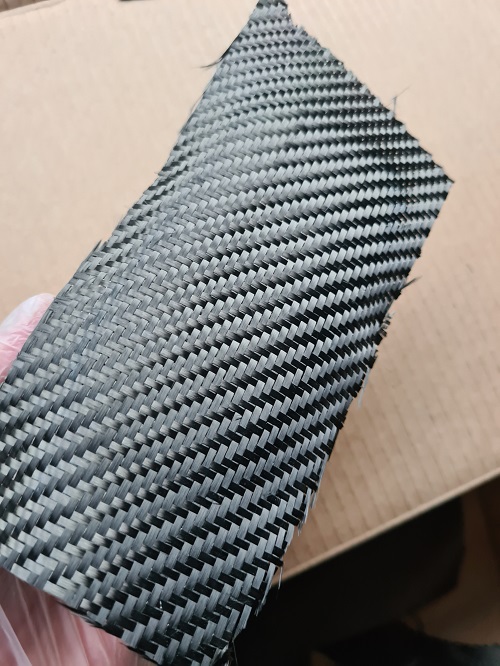
- Spend some time with the dry carbon fibre, seeing how easily it frays, etc. Carbon fibre cuts easily with scissors, but we recommend laying a line of tape along the line you’re cutting to hold it together.
- Make some test parts to see how the carbon and epoxy behave. Learn the tack times of your epoxy, how easy it is to position/reposition, flatten, shape, and work with the materials. See what happens when you lay-up immediately or wait until the epoxy tacks-up and then do the layup.
- Sharp bends are difficult to achieve without cuts. 90-degrees is tough since you generally can’t get enough pressure on the corner to form a right angle. With sharper angles, you can get some mechanical advantage that makes it a bit easier, but even obtuse angles can be a challenge. Often, you can use tape to pull the edges of the fabric around the part to the underside but note that you need to have a base coat of epoxy on the top surface, and since it gets everywhere – including the underside – you may have a challenge in sticking the tape to the base part (this is where planning can be helpful). We recommend using a vacuum bag.
- Epoxy has a pot life, meaning, when it sits in liquid form in a cup it has a limited amount of time before it heats up and suddenly “smokes off” becoming solid. Once the pot gets hot, you have but a few minutes left before it changes phase in a puff of smoke. Do not inhale the smoke and always wear protective gear when working with carbon fibre and resins.
- Epoxy can be sanded and shaped as much as is needed. The part is rarely perfect in bare epoxy once it is initially cured, even in moulds. So, don’t be scared by a part that comes out rough – remember that you can shape it. If you have drips on the backside, don’t worry – they can be ground or sanded or scraped off.
- Be ready to do a lot of hand sanding, unless you have a small 3” air or electric sander. If you follow up with wet sanding just use water and a bit of soap. Sometimes, you’ll need to work up from 150, but I’m typically starting with 400, then doing 800, 1500, and 2000. We have used – nearly every grit from 80 to 3000 in making carbon parts and wrapping parts in carbon throughout the time (though you can probably get away with 400, 800, 1500, and 2000). Use both hard and flexible sanding blocks. Also, have polishing compound and a buffer if you want a nearly perfect finish.
- The Dremel is your best friend, big time. You’ll rely on the cut-off wheels (the fragile wheels are the best for fine finish work; however we recommend the diamond wheel for clean, durable cut), and the material removal bits (shaped like helical gear at the end). Also, have a shop vac ready and running as you grind away – like any material removal process, epoxy dust gets EVERYWHERE. I’d use a clamp to position the vac nozzle on the workbench right next to where we do the cutting, so it’d pick up all the dust. Wear a respirator if you have it, or a dust mask.
- Clear coats are essential – they can take a dull epoxy and make it brilliant (even the matte finishes). Be sure to look for UV-stable clear coats. Also remember that a single-part, rattle can clear coat can look great, but it will lack durability. If you want durability, you really want to look for a two-part clear coat (with the base paint and a hardener or activator) that you either mix and spray within an hour or two.
- Mixing cups, like you’d see at a paint store. Minimize epoxy waste by getting smaller graduated mixing cups. DO NOT mix epoxy in wax cups. Just do the mix in plastic cups.
- Pay attention to which plastics will stick to epoxy, and which won’t, and which are in the middle, and how to compensate for it. Epoxy won’t stick to PET, HDPE, or acetate (PET is used in those wretched, impervious sonic welded plastic packages; (HDPE is what a milk bottles are made out of). ABS is in the middle, so you need to get a more mechanical adhesion vs. chemical, by roughing the surface.
- If you choose to overlay or bag your parts with a film plastic to achieve a better, flatter finish on the first try, use a thicker mil so as not to incur wrinkling or warping.
Things you need:
- Carbon fibre – 200gsm to 240gsm – Enhanced Composites has a variety of weaves of carbon fibre in stock. –
https://enhancedcomposites.com.au/product-category/composite-reinforcement-fabrics/ - Epoxy resin – clear –
https://enhancedcomposites.com.au/product-category/resins/ - Epoxy black pigment
- Tapes (painter’s tape for holding things together; packing tape for lining surfaces that you don’t want epoxy to stick to)
- Paper or other protective materials for your work areas (obviously)
- Dremel – the essential tool here
- Sandpaper (up to 2000 grit)
- Heat gun/propane torch
- Nitrile gloves
- Respirator or dust mask (mostly for the Dremel process)
- Vacuum cleaner
- Knives (X-ACTO knife; utility knife; chisels for scraping drips from the backside)
- Scissors (carbon fibre fabric is easy to cut, so you don’t need special scissors)
- Acetone (for clean-up)
- Mixing cups, graduated. Use the same type that you’d find in a paint store and try to get small sizes so you can mix small batches.
- Plasticine/modelling clay for protecting certain areas from epoxy intrusion. – Only if you need to
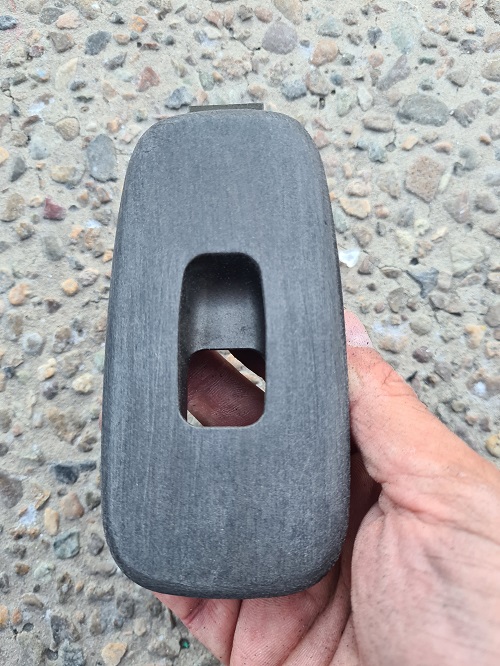
STEP 1: EXAMINE THE PARTS
The parts provided here are interior switches of a Lexus IS200. Prior to starting the carbon wrap, it is very important to do some surface preparation. In addition, do note that if your parts are too complex, there might be a need for some clean cuts in the carbon fibre material. Before you start working on more complex parts, we recommend starting with a simpler part if you are considering a wrap project yourself.
STEP 2: SURFACE PREPARATION
There are a few things to consider before performing a carbon fibre wrap on a part:
First, is the part smooth? If the part has too smooth surface finish the carbon fibre may not stick to it. If this is the case, sand the surface with a low grit sandpaper (~80 grit). Make sure all bonding surfaces are sufficiently scuffed. We also recommend making some small holes in the surface using a small Dremel bit. It helps by increasing the strength of the bond to the surface you apply the carbon fibre to.
Second, what colour is the surface? Because you will be using a single layer of carbon fibre to wrap the part, there is the possibility that the original colour of the part will show through. To prevent this from being visible, some people recommend spraying the part, however we recommend using a black pigment in the base epoxy.
Third, how will the carbon be attached prior to the resin curing? We always recommend using base fast curing epoxy for the first layer. Do not use adhesive spray! When resin is applied, the spray adhesive will dissolve and lose its tackiness. As this occurs some surfaces may release from the part and the result can be unsightly bumps across the surface.
Before laying the base epoxy layer make sure that the part is:
- Sanded – Use 80 grit and 40 grit for a better surface bond. You can make small holes to increase the anchor points. Sand in different directions so there is enough rough surface to bond to.
- Clean – Air blow, wash and use IPA (Isopropyl alcohol) to clean the part. Before you apply the epoxy, we recommend doing the flame treatment, using a propane torch. We recommend doing this for parts that are particularly made from low energy plastics like ABS.
Flame treatment is the most widely used and cost-effective pre-treatment for polyethylene (HDPE, LDPE, UHMW) and polyolefin-based plastics prior to polymer bonding or printing. It consists of exposing the surface to be coated to a suitable oxidizing flame during a short period of time (0.2 to 3 sec.).
The resulting change of the surface by creating an oxidized surface greatly improves the liquid’s ability to wet-out the surface thus creating a strong adhesive bond between the surface and the coating.

STEP 3: SURFACE PAINT WITH EPOXY
Painting the original part with epoxy and letting it cure to a nice tack before applying the carbon fibre is very important in this process. When we say nice tack we mean, that it is tacky, but it does not come off on your fingers. If it comes off on your fingers, once you put the carbon fibre down, the carbon will absorb the resin in its fibres leaving little to no resin on the part to bond to.
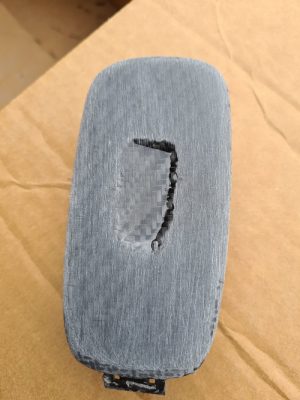
STEP 4: WRAP THE PART IN CARBON FIBRE
This part of the process requires the most patience and focus. Ensure that the fibres are straight, and all edges are fully wrapped. In a complex part like this one, determine where you will hide the seam.in a complex part, always start on the most important (visible) surface. Once that surface has been stuck you can fold, cut, and wrap to complete the rest of the surfaces. Cut slits in the carbon where is needed for it to deform to wrap your part. Once again, try to finish all edges on the underside of the part. Extra spray adhesive/epoxy can be used to adhere flaps to the underside.
At this stage, we recommend putting this part in a vacuum bag and keep it there for couple of hours if not more. That way you will have your part fully attached to the part with no risk of potential lift off the part.
STEP 5: APPLY THE RESIN
Once the carbon fibre is fully glued onto your part, you can apply the resin. You can use a foam or bristle brush to fully coat as much of the carbon fibre as possible. When applying the first layer, there is guaranteed to see the carbon fibre weave texture on the surface; don’t worry about trying to eliminate it all on the first pass. Doing a carbon wrap typically requires at least three layers of resin.
TIP: Unless you have a temperature and humidity controlled room, we recommend to do this when the temperature outside is over 20°C and humidity below 60%. Doing this you will avoid the amine blush. Amine blush presents itself as a milky appearance within the resin and is caused by the presence of moisture in the air during the cure. To prevent this, it is best for resin to cure in a vacuum, but this can’t always be achieved when wrapping a part. To minimize the risks, consider only doing a process like this on a hot day when the humidity is low.
When you have complex shapes, you will find it is much easier to apply a thick layer of resin to a horizontal surface, then a vertical surface. As resin is applied, layer after layer, you will likely notice bubbles forming in the resin. Once you have applied the epoxy resin, use the propane torch (only on epoxy resins) on the lowest setting and hover the soft flame quickly over the part to get rid of the air bubbles. You can use a heat gun as well.
The result is a glass-like finish clear of voids. Be very careful to not get the resin too hot as it can start to cure prematurely. This is one of the most important tricks to making a carbon fibre wrapped part look good.
The additional layers of epoxy can be applied in two ways:
- by creating a mechanical bond after cure – sand the part and apply another layer of resin
- by chemical bond – when the first layer of epoxy gets tacky, apply another layer of fresh epoxy
STEP 6: TRIMMING
Trimming
Once the resin is completely cured, you can move on to the next step.
Cutting from the back, we recommend using a Dremel tool with a cut-off wheel to get it close to the edge of the shape. Then put a sanding cylinder on the Dremel to get it right up to the edge, again from the back. It’s very quick and easy but will throw off a lot of dust. You will need to wear your dust mask and safety goggles. For parts where you need to cut different shapes, we recommend finding the right size sanding wheels before you proceed.
STEP 7: SANDING
Dry Sanding
Once enough layers of resin have been built up and there is no longer any carbon fibre weave texture, the part is ready to be sanded to its final state. Depending on the part you can either use a sanding machine or do it by hand.
If the part has plenty of resin build up, start at a low grit (80 to 120) to ensure the part is flat without any pumps. Take note not to sand through the resin into the carbon. Start sanding down your part to flatten down the resin. Use a gentle amount of pressure as the grit is coarse and the resin is soft! You want to be careful of any high parts not breaking through.
If you have low spots, don’t panic. Completely wash off your part and dry it, then add another layer of resin. Wait until the surface has dried to a tack and apply another layer if needed. To create the chemical bond between the layers, you don’t need to wait for it to fully cure between layers, but you do want to make sure it is fully cured before sanding again.
The goal here is that after sanding you want everything to be a uniform grey colour. Once you have the part all sanded move on to the next step.
Wet Sanding
From 400 grit and higher you want to wet sand and don’t need the sanding block. Fill up your bucket halfway with water. Add a drop or 2 of soap. Dunk your paper and start sanding. You want to rinse your part and dunk your paper frequently. Try not to leave any of the big scratches from the coarser grit behind, but since we are going to clear coat on top don’t get frustrated if you don’t get them all. You can use more pressure here since you’re not likely to break through any thin spots at this point.
Also make sure to completely rinse off your part and your bucket and change the water out when switching grits. You want to sand with the finer grit and not the leftover grit and debris from your earlier sanding.
It will still kind of look grey and ugly like the earlier pictures but will feel a lot smoother.
When wet sanding the water should appear white and milky. If it turns dark and black, this means you have sanded too deep and are in the carbon. If you sand too deep into the carbon you may distort the weave, or worse, go straight through it. If this is the case, you will need to add another layer of resin.
Assuming you don’t have to add more resin, continue to wet sand as you step through your grits. Before stepping up to a higher grit, ensure all scratches from the previous grit have been removed. I would recommend the following grits: 220 – 400 – 600 – 800. At this point the part is ready to be clear coated with clear 2k paint. If you don’t want to clear coat your part, you can go all the way up to 2,000 grit you and get it ready to buff and polish the parts! However, if you want an added level of UV protection, we recommend spraying the part in couple of coats of automotive clear coat to prevent yellowing of the epoxy resin.
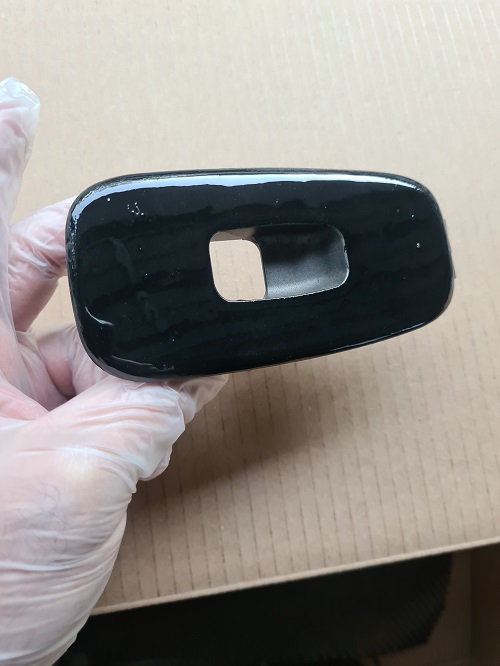
STEP 8: Clear coat and polish
Make sure the part is clean of any dust, wax or grease. We recommend cleaning the part with IPA (Isopropyl alcohol).
Proceed to clear coat your part. We recommend at least 3 to 4 coats of clear. When the part has dried (depending on the type of clear you are using), you can wet sand the part with 1500 – 2000 – 2500. And polish to a mirror finish part!
